
Installing an outdoor water fountain is one of the best ways to enhance your garden, patio, courtyard, or outdoor living space. A properly installed fountain creates a beautiful focal point, adds the soothing sound of flowing water, and increases the overall appeal of your landscape.
Whether you’re installing a modern water fountain, a tiered garden fountain, a wall fountain, or a decorative stone water feature, following the correct installation process is essential for long-term performance and minimal maintenance.
This step-by-step guide explains everything homeowners need to know about outdoor water fountain installation, from planning and preparation to setup and ongoing maintenance.
Tools and Materials You’ll Need
Before starting your outdoor water fountain installation project, gather the necessary tools and materials.
Essential Tools
- Shovel
- Spirit level
- Tape measure
- Wheelbarrow
- Rubber mallet
- Garden hose
- Utility knife
- Screwdrivers
- Drill (if required)
Materials
- Outdoor water fountain
- Fountain pump
- Water tubing
- Gravel or crushed stone
- Concrete base or pavers (if needed)
- Waterproof sealant
- Electrical extension cable
- Decorative stones
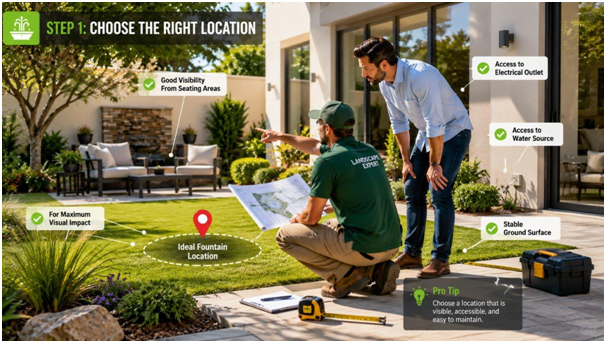
Step 1: Choose the Right Location
Selecting the correct location is one of the most important parts of the installation process.
When choosing a location, consider:
- Visibility from key viewing areas
- Proximity to electrical outlets
- Access to a water source
- Ground stability
- Sunlight exposure
- Surrounding landscaping
The fountain should become a focal point within the landscape while remaining practical to maintain.
Avoid installing fountains directly under trees because falling leaves and debris can clog pumps and increase maintenance requirements.
Pro Tip
Position the fountain where it can be viewed from outdoor seating areas, patios, or indoor windows for maximum visual impact.
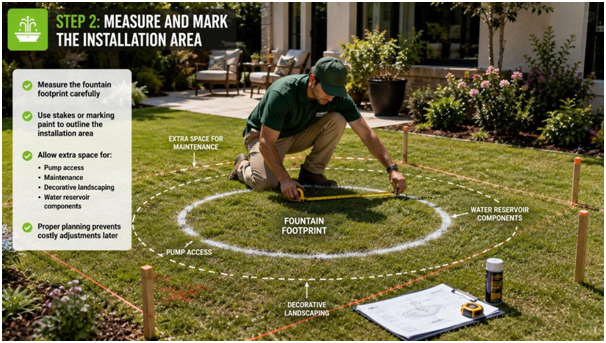
Step 2: Measure and Mark the Installation Area
Once the location has been selected, measure the fountain footprint carefully.
Use stakes or marking paint to outline the installation area.
Make sure to allow extra space for:
- Pump access
- Maintenance
- Decorative landscaping
- Water reservoir components
Proper planning at this stage helps prevent costly adjustments later.
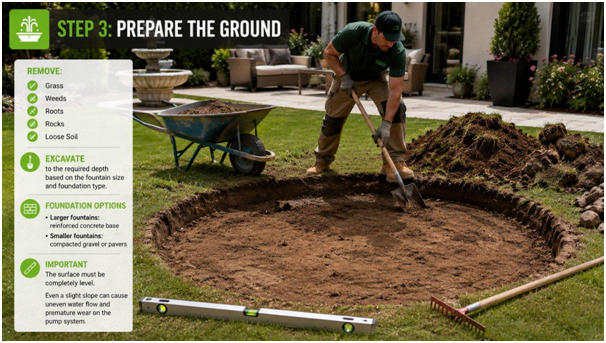
Step 3: Prepare the Ground
A stable foundation is critical for any outdoor water fountain.
Remove:
- Grass
- Weeds
- Roots
- Rocks
- Loose soil
Excavate the area to the required depth based on the fountain size and foundation type.
For larger fountains, you may need a reinforced concrete base.
For smaller garden fountains, compacted gravel and pavers are often sufficient.
The surface must be completely level.
Even a slight slope can cause uneven water flow and premature wear on the pump system.
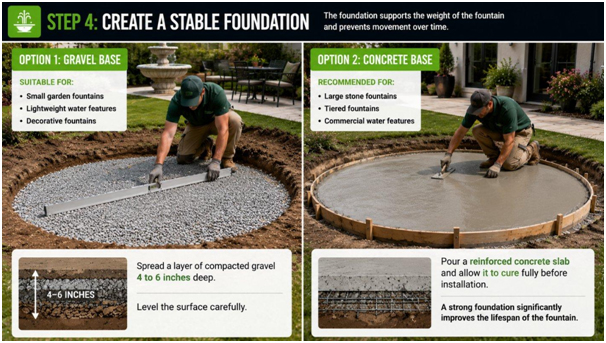
Step 4: Create a Stable Foundation
The foundation supports the weight of the fountain and prevents movement over time.
Option 1: Gravel Base
Suitable for:
- Small garden fountains
- Lightweight water features
- Decorative fountains
Spread a layer of compacted gravel approximately 4 to 6 inches deep.
Level the surface carefully.
Option 2: Concrete Base
Recommended for:
- Large stone fountains
- Tiered fountains
- Commercial water features
Pour a reinforced concrete slab and allow it to cure fully before installation.
A strong foundation significantly improves the lifespan of the fountain.
Step 5: Install the Water Reservoir
Many outdoor water fountains use a hidden reservoir beneath the structure.
The reservoir collects and recirculates water through the pump system.
Carefully place the basin according to manufacturer specifications.
Ensure:
- The basin is level
- The pump chamber remains accessible
- Water tubing routes correctly
An improperly installed reservoir can cause drainage and circulation problems later.

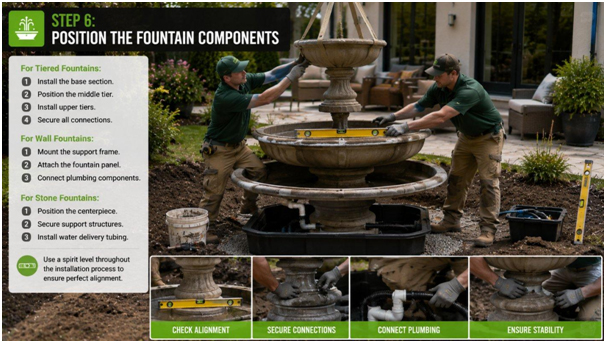
Step 6: Position the Fountain Components
Begin assembling the fountain structure.
For tiered fountains:
- Install the base section.
- Position the middle tier.
- Install upper tiers.
- Secure all connections.
For wall fountains:
- Mount the support frame.
- Attach the fountain panel.
- Connect plumbing components.
For stone fountains:
- Position the centerpiece.
- Secure support structures.
- Install water delivery tubing.
Use a spirit level throughout the installation process to ensure perfect alignment.
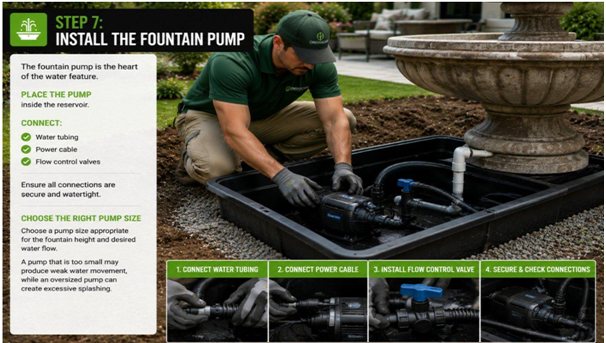
Step 7: Install the Fountain Pump
The fountain pump is the heart of the water feature.
Place the pump inside the reservoir.
Connect:
- Water tubing
- Power cable
- Flow control valves
Ensure all connections are secure and watertight.
Choose a pump size appropriate for the fountain height and desired water flow.
A pump that is too small may produce weak water movement, while an oversized pump can create excessive splashing.
Step 8: Connect Electrical Components Safely
Outdoor fountains typically require electricity to operate the pump.
Always:
- Use weatherproof outdoor outlets
- Install GFCI protection
- Keep cables protected
- Follow local electrical regulations
If electrical connections are complex, consult a qualified electrician.
Safety should always be the priority.

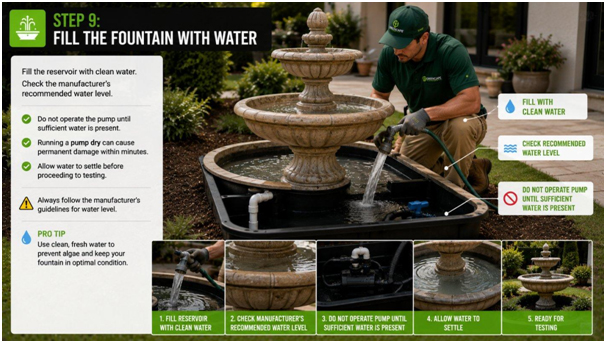
Step 9: Fill the Fountain with Water
Fill the reservoir with clean water.
Check the manufacturer’s recommended water level.
Do not operate the pump until sufficient water is present.
Running a pump dry can cause permanent damage within minutes.
Allow water to settle before proceeding to testing.
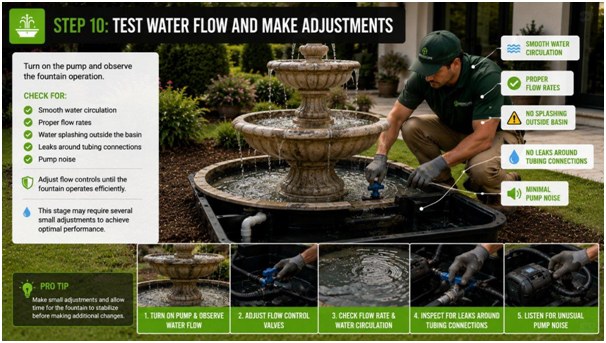
Step 10: Test Water Flow and Make Adjustments
Turn on the pump and observe the fountain operation.
Check for:
- Smooth water circulation
- Proper flow rates
- Water splashing outside the basin
- Leaks around tubing connections
- Pump noise
Adjust flow controls until the fountain operates efficiently.
This stage may require several small adjustments to achieve optimal performance.
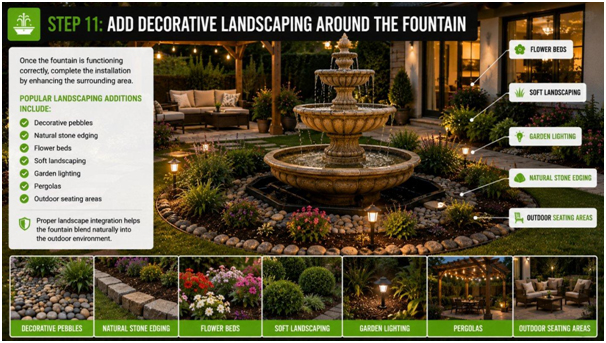
Step 11: Add Decorative Landscaping Around the Fountain
Once the fountain is functioning correctly, complete the installation by enhancing the surrounding area.
Popular landscaping additions include:
- Decorative pebbles
- Natural stone edging
- Flower beds
- Soft landscaping
- Garden lighting
- Pergolas
- Outdoor seating areas
Proper landscape integration helps the fountain blend naturally into the outdoor environment.
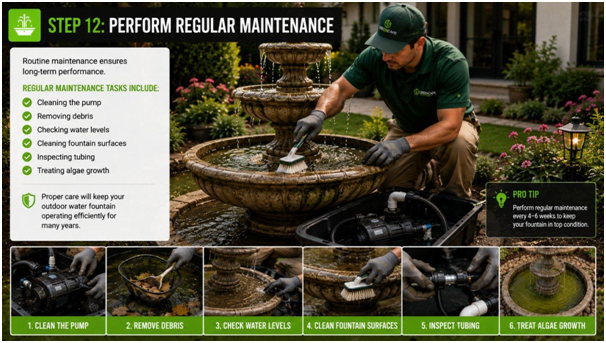
Step 12: Perform Regular Maintenance
Routine maintenance ensures long-term performance.
Regular maintenance tasks include:
- Cleaning the pump
- Removing debris
- Checking water levels
- Cleaning fountain surfaces
- Inspecting tubing
- Treating algae growth
Proper care will keep your outdoor water fountain operating efficiently for many years.
Common Outdoor Water Fountain Installation Mistakes to Avoid
- Installing on uneven ground
- Using an undersized pump
- Ignoring drainage requirements
- Poor electrical planning
- Allowing excessive water splashing
- Skipping routine maintenance
- Choosing the wrong fountain size for the space
Final Thoughts
Outdoor water fountain installation can significantly improve the beauty, atmosphere, and value of any landscape. By following the proper planning, foundation preparation, pump installation, and maintenance procedures, homeowners can enjoy a durable and visually stunning water feature for years to come.
For larger, custom, or luxury water features, professional installation can help ensure optimal performance, safety, and long-term durability.